Difference between revisions of "Meteobridge VM on PROXMOX"
From meteobridge
| (4 intermediate revisions by the same user not shown) | |||
| Line 1: | Line 1: | ||
| − | When there is a PROXMOX VE installed on your machine you can use the | + | When there is a PROXMOX VE installed on your machine you can use the Meteobridge VM raw image (used for KVM) to setup a Meteobridge within your PROXMOX environment. |
| − | First | + | First step is to create a new Meteobridge VM within your PROXMOX environment. |
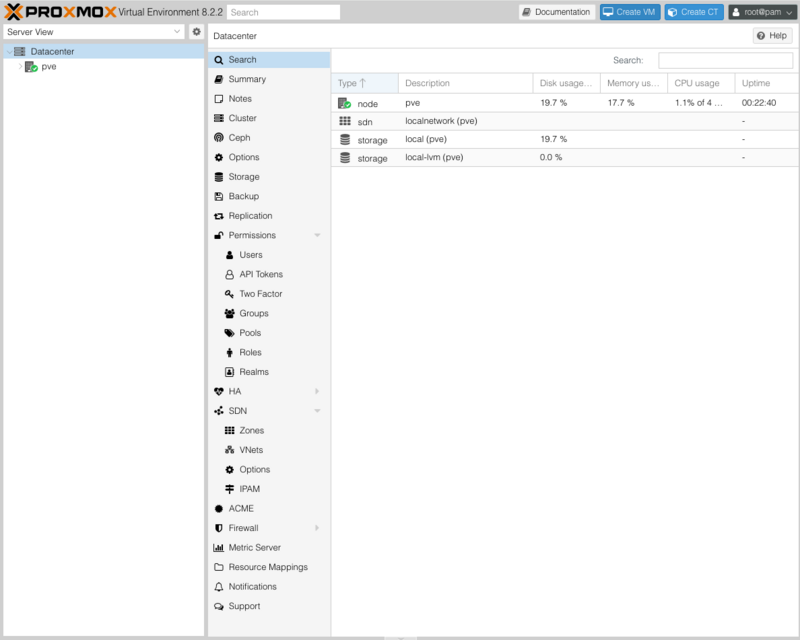
* Direct your browser to the PROXMOX Web GUI and press "Create VM" button.<BR>[[File:pm1.png|top|800px]] | * Direct your browser to the PROXMOX Web GUI and press "Create VM" button.<BR>[[File:pm1.png|top|800px]] | ||
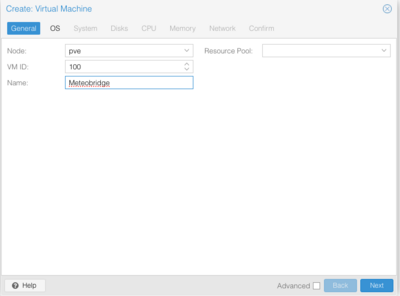
* Insert "Meteobridge" as the name of the new VM and notice the VM ID (here "100") as you will need this later on to generate a disk image for this specific VM. | * Insert "Meteobridge" as the name of the new VM and notice the VM ID (here "100") as you will need this later on to generate a disk image for this specific VM. | ||
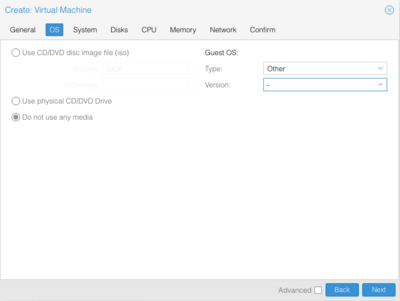
| − | * Goto "OS" tab and select "Do not use any media" and "Guest OS" type | + | * Goto "OS" tab and select "Do not use any media" and set "Guest OS" type to "Other".<BR>[[File:pm2.png|top|400px]] [[File:pm3.png|top|400px]] |
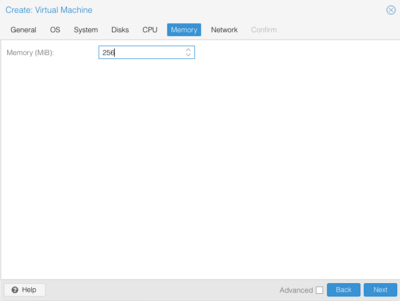
| − | * Goto "Memory" tab and insert 256 MB as memory size. This is | + | * Goto "Memory" tab and insert 256 MB as memory size. This is enough for Meteobridge and it will not benefit from more. |
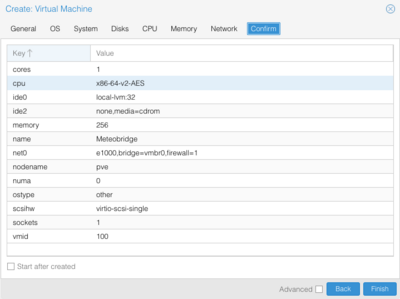
* Settings on the other tabs can stay at default values. Goto "Confirm" tab to check that all settings are like in the example below. Then press "Finish".<BR>[[File:pm4.png|top|400px]] [[File:pm5.png|top|400px]] | * Settings on the other tabs can stay at default values. Goto "Confirm" tab to check that all settings are like in the example below. Then press "Finish".<BR>[[File:pm4.png|top|400px]] [[File:pm5.png|top|400px]] | ||
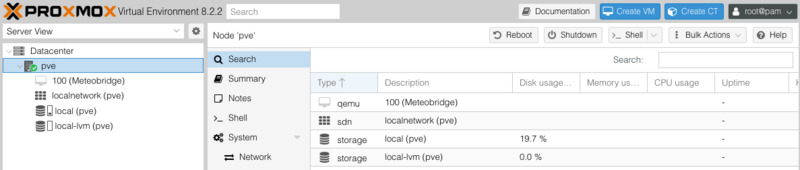
| − | * As a result a new VM named "Meteobridge" with | + | * As a result a new VM named "Meteobridge" with a dedicated VM ID (here "100") is created. You may need to click onto the "pve" row to make the newly created VM visible.<BR>[[File:pm6.png|top|800px]] |
Now it is time to attach the Meteobridge image file to the created VM. | Now it is time to attach the Meteobridge image file to the created VM. | ||
| − | * First step is to bring the Meteobridge Image onto your PROXMOX | + | * First step is to bring the Meteobridge Image onto your PROXMOX environment. We recommend to login via SSH on the PROXMOX VE as user "root" and then to download the Meteobridge raw image via wget on the command line. |
<pre>wget -O meteobridge.img.gz https://admin.meteobridge.com/files/meteobridge-mbx86-v1.0-16G.img.gz</pre> | <pre>wget -O meteobridge.img.gz https://admin.meteobridge.com/files/meteobridge-mbx86-v1.0-16G.img.gz</pre> | ||
* The downloaded compressed image needs to be uncompressed. This will take some time and results into a 16GB image file. | * The downloaded compressed image needs to be uncompressed. This will take some time and results into a 16GB image file. | ||
<pre>gunzip meteobridge.img.gz</pre> | <pre>gunzip meteobridge.img.gz</pre> | ||
| − | * Next step is to make the disk image available for your Meteobridge VM. You do that by issuing the following command: | + | * Next step is to make the disk image available for your Meteobridge VM. You do that by issuing the following command (if your Meteobridge VM ID is not "100" replace "100" in the command below with the proper VM ID: |
<pre>qm disk import 100 meteobridge.img local-lvm -format raw</pre> | <pre>qm disk import 100 meteobridge.img local-lvm -format raw</pre> | ||
* PROXMOX will create the new disk and it will be named "unused0:local-lvm:vm-100-disk-1" or alike. | * PROXMOX will create the new disk and it will be named "unused0:local-lvm:vm-100-disk-1" or alike. | ||
| − | Now you can | + | Now you can exit the command line and continue the setup with the Web GUI. |
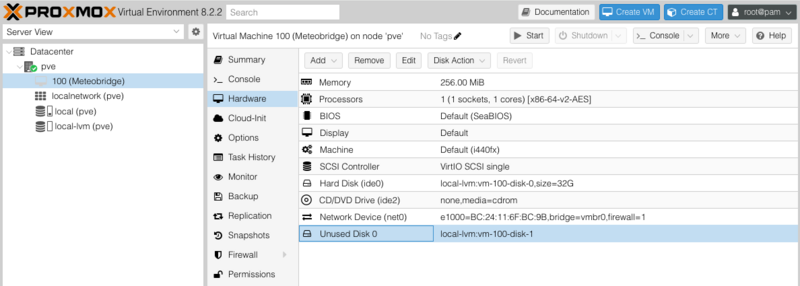
| − | * Select "Hardware" section of the Meteobridge VM. You will see an "Unused Disk 0" which is exactly the one just created | + | * Select "Hardware" section of the Meteobridge VM. You will see an "Unused Disk 0" which is exactly the one just created via the command line.<BR>[[File:pm7.png|top|800px]] |
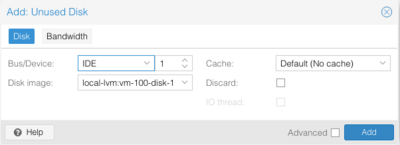
* Double click on the "Unused Disk" entry and you will see disk details. Click onto "Add" to add this disk to your Meteobridge VM.<BR>[[File:pm8.png|top|400px]] | * Double click on the "Unused Disk" entry and you will see disk details. Click onto "Add" to add this disk to your Meteobridge VM.<BR>[[File:pm8.png|top|400px]] | ||
| − | * As a result two disks will | + | * As a result two disks will show up as being attached to your Meteobridge VM. |
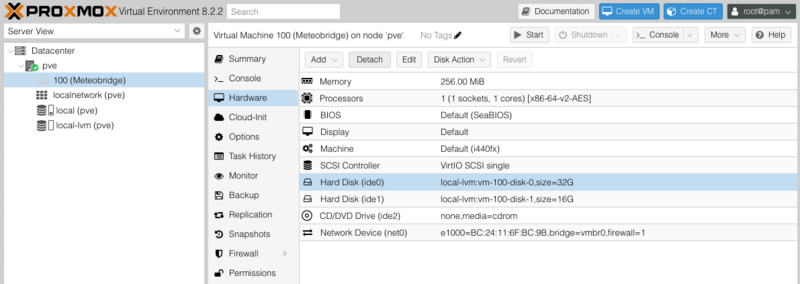
| − | * Select the disk ide0 (which has been initially added to the Meteobridge VM as default) and detach this disk by clicking the "Detach" button.<BR>[[File:pm9.png|top|800px]] | + | * Select the disk "ide0" (which has been initially added to the Meteobridge VM as default) and detach this disk by clicking the "Detach" button.<BR>[[File:pm9.png|top|800px]] |
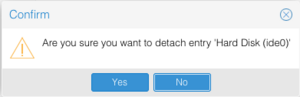
* PROXMOX will ask you to confirm this operation, Press "Yes".<BR>[[File:pm10.png|top|300px]] | * PROXMOX will ask you to confirm this operation, Press "Yes".<BR>[[File:pm10.png|top|300px]] | ||
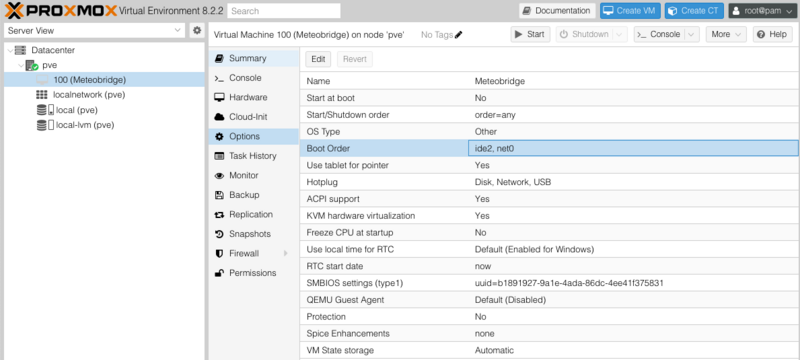
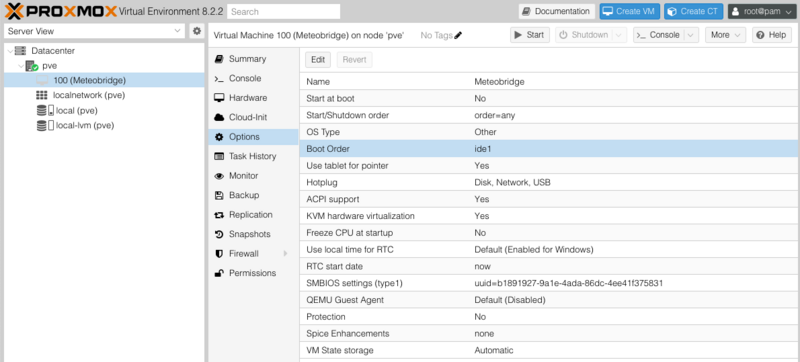
| − | * Next step is to change the boot order. You can do that | + | * Having done so the Meteobridge VM now only has one disk attached, the one you have imported by your command line interaction. Next step is to change the boot order. You can do that via the menu entry "Options". Double click "Boot Order" to apply changes.<BR>[[File:pm11.png|top|800px]] |
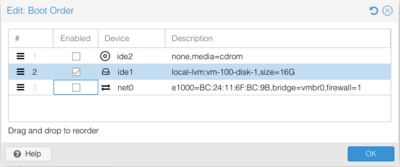
* Make sure that only "ide1" is enabled for boot and press "OK".<BR>[[File:pm12.png|top|400px]] | * Make sure that only "ide1" is enabled for boot and press "OK".<BR>[[File:pm12.png|top|400px]] | ||
* Check in the overview that boot order settings have been applied correctly.<BR>[[File:pm13.png|top|800px]] | * Check in the overview that boot order settings have been applied correctly.<BR>[[File:pm13.png|top|800px]] | ||
| + | * Last thing to do is to make the weather station connected via USB to your server available to the Meteobridge VM. Add "USB Device" at the "Hardware" section.<BR>[[File:pm16.png|top|800px]] | ||
| + | * In case of a Meteostick select "Use USB Vendor/Device ID" option and select "FT232R USB UART" which is the USB-serial converter used by the Meteostick. Confirm selection by pressing "Add". <BR>[[File:pm17.png|top|400px]] | ||
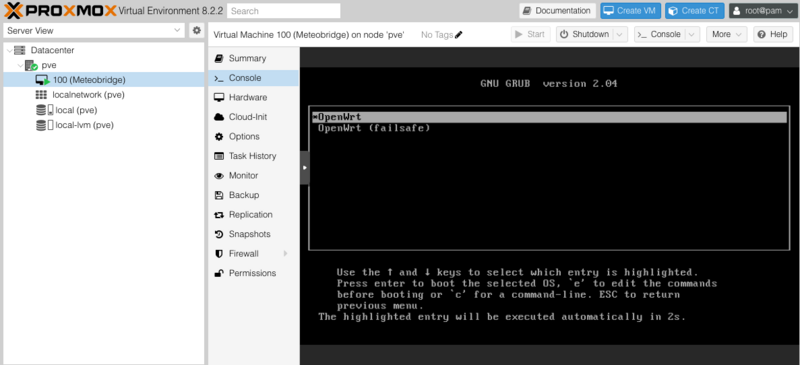
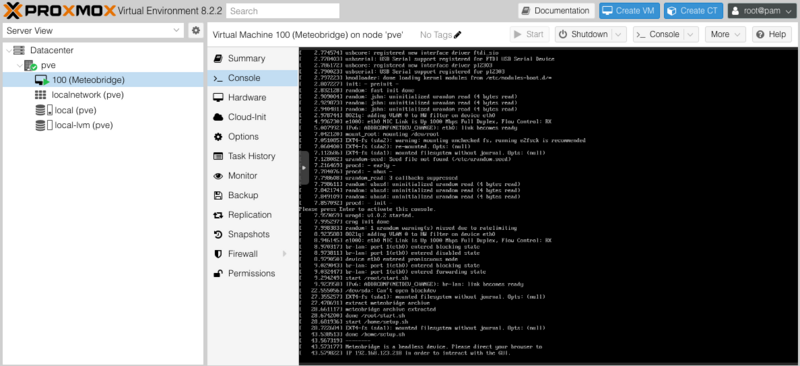
* Now select "Console" operation and press "Start". Meteobridge VM will start into GRUB and will boot a few seconds later.<BR>[[File:pm14.png|top|800px]] | * Now select "Console" operation and press "Start". Meteobridge VM will start into GRUB and will boot a few seconds later.<BR>[[File:pm14.png|top|800px]] | ||
| − | * | + | * When boot has finished you will see the hint in the log that Meteobridge is now operational and it will also tell you the IP where to access the Web GUI of Meteobridge.<BR>[[File:pm15.png|top|800px]] |
| − | + | * Now you can direct your browser to this IP to start working with Meteobridge. HTTP default user is "meteobridge" and password is "meteobridge", too. | |
| − | + | ||
| − | + | ||
| − | + | ||
| − | + | ||
| − | + | ||
| − | + | ||
Latest revision as of 14:18, 20 May 2024
When there is a PROXMOX VE installed on your machine you can use the Meteobridge VM raw image (used for KVM) to setup a Meteobridge within your PROXMOX environment.
First step is to create a new Meteobridge VM within your PROXMOX environment.
- Direct your browser to the PROXMOX Web GUI and press "Create VM" button.
- Insert "Meteobridge" as the name of the new VM and notice the VM ID (here "100") as you will need this later on to generate a disk image for this specific VM.
- Goto "OS" tab and select "Do not use any media" and set "Guest OS" type to "Other".
- Goto "Memory" tab and insert 256 MB as memory size. This is enough for Meteobridge and it will not benefit from more.
- Settings on the other tabs can stay at default values. Goto "Confirm" tab to check that all settings are like in the example below. Then press "Finish".
- As a result a new VM named "Meteobridge" with a dedicated VM ID (here "100") is created. You may need to click onto the "pve" row to make the newly created VM visible.


Now it is time to attach the Meteobridge image file to the created VM.
- First step is to bring the Meteobridge Image onto your PROXMOX environment. We recommend to login via SSH on the PROXMOX VE as user "root" and then to download the Meteobridge raw image via wget on the command line.
wget -O meteobridge.img.gz https://admin.meteobridge.com/files/meteobridge-mbx86-v1.0-16G.img.gz
- The downloaded compressed image needs to be uncompressed. This will take some time and results into a 16GB image file.
gunzip meteobridge.img.gz
- Next step is to make the disk image available for your Meteobridge VM. You do that by issuing the following command (if your Meteobridge VM ID is not "100" replace "100" in the command below with the proper VM ID:
qm disk import 100 meteobridge.img local-lvm -format raw
- PROXMOX will create the new disk and it will be named "unused0:local-lvm:vm-100-disk-1" or alike.
Now you can exit the command line and continue the setup with the Web GUI.
- Select "Hardware" section of the Meteobridge VM. You will see an "Unused Disk 0" which is exactly the one just created via the command line.
- Double click on the "Unused Disk" entry and you will see disk details. Click onto "Add" to add this disk to your Meteobridge VM.
- As a result two disks will show up as being attached to your Meteobridge VM.
- Select the disk "ide0" (which has been initially added to the Meteobridge VM as default) and detach this disk by clicking the "Detach" button.
- PROXMOX will ask you to confirm this operation, Press "Yes".
- Having done so the Meteobridge VM now only has one disk attached, the one you have imported by your command line interaction. Next step is to change the boot order. You can do that via the menu entry "Options". Double click "Boot Order" to apply changes.
- Make sure that only "ide1" is enabled for boot and press "OK".
- Check in the overview that boot order settings have been applied correctly.
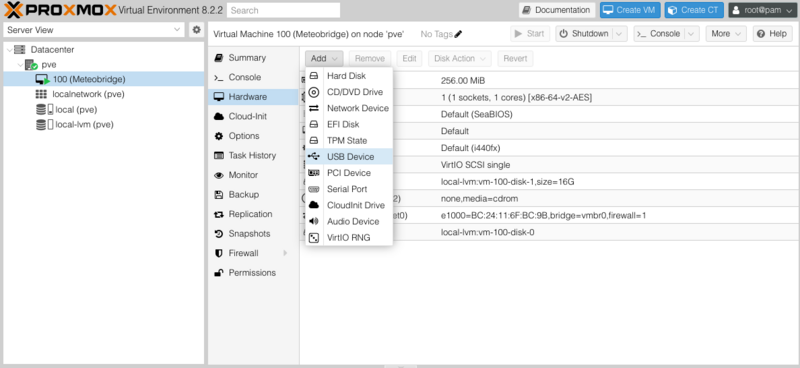
- Last thing to do is to make the weather station connected via USB to your server available to the Meteobridge VM. Add "USB Device" at the "Hardware" section.
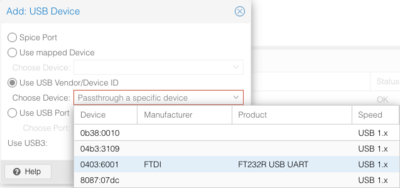
- In case of a Meteostick select "Use USB Vendor/Device ID" option and select "FT232R USB UART" which is the USB-serial converter used by the Meteostick. Confirm selection by pressing "Add".
- Now select "Console" operation and press "Start". Meteobridge VM will start into GRUB and will boot a few seconds later.
- When boot has finished you will see the hint in the log that Meteobridge is now operational and it will also tell you the IP where to access the Web GUI of Meteobridge.
- Now you can direct your browser to this IP to start working with Meteobridge. HTTP default user is "meteobridge" and password is "meteobridge", too.


