Preparing Hardware
Contents
- 1 Before you start flashing
- 2 Copying the Meteobridge disk image onto a Raspberry Pi microSD card
- 3 Flashing by the router's web interface
- 3.1 Flashing Meteobridge Firmware to TL-MR3020 (version 1.x) - this unit is EOL
- 3.2 Flashing Meteobridge Firmware to TL-WR902AC (version 1.x) - this unit is EOL
- 3.3 Flashing Meteobridge Firmware to TL-MR3040 (version 2.x) - this unit is EOL
- 3.4 Flashing Meteobridge Firmware to TL-WR703N (versions 1.0 to 1.6) - this unit is EOL
- 3.5 Flashing Meteobridge Firmware to DIR-505
- 4 Flashing with the help of a TFTP server
- 4.1 Setup of TFTP server on Linux
- 4.2 Setup of TFTP server on Windows
- 4.3 Setup of TFTP server on Mac OS
- 4.4 Flashing Meteobridge Firmware to TL-MR3020 (version 3.x)
- 4.5 Flashing Meteobridge Firmware to TL-WR902AC (version 3.x)
- 4.6 Flashing Meteobridge Firmware to WL-330N3G (newest version no longer flashable)
- 5 Flash Again
Before you start flashing
To make a Meteobridge out of the pocket WLAN routers introduced below, you simply have to install an applicable Meteobridge firmware image. When flashing Meteobridge firmware onto the router you will void the manufacturers warranty, but having the cheap price in mind you will certainly not face a substantial financial risk in the unlikely event that you brick the router.
If you don't like the idea of flashing devices, you can also reach out for a Meteobridge reseller, who has Meteobridges on standard HW already flashed and fully licensed in Where to Buy? section.
If your intent is to use Meteobridge on a Raspberry Pi then you just have to copy the disk image onto the micro SD card of the Raspberry Pi.
If you own a Meteobridge PRO or NANO, please ignore these pages completely as your unit is already flashed the right way in the factory and you received it ready to go.
Copying the Meteobridge disk image onto a Raspberry Pi microSD card
Meteobridge disk image is available for Raspberry Pi models 3B, 3B+ and 4B. Please down load the matching disk image from here:
- Raspbery Pi Model 4B: meteobridge-rpi4-v1.4.bin (v1.4 disk image also supports revision 1.5 of RPI 4B models. If you have trouble in making use of WiFi please try previous v1.3 disk image, linked here: meteobridge-rpi4-v1.3.bin
- Raspbery Pi Model 3B and 3B+: meteobridge-rpi3-v1.3.bin
Next step is to use a low level disk copy tool like "etcher" or "Raspberry Pi Imager" to transfer the Meteobridge disk image onto the SD card. When using "Etcher" you need to enable "all files" in the file selection dialog in order to load the Meteobridge disk image which has a ".bin" extension. "Etcher" is reported not to work properly on some Windows installs (When it throws system errors during copy, please use Raspberry Pi Images instead). When using the "Raspberry Pi Imager" you have to select the "Use Custom" option as Operating system and you also have to enable "all files" to load the ".bin" named Meteobridge disk image. Trying to avoid these tools and doing just a regular file copy of the Meteobridge disk image to the microSD card will not work. We need to punch the disk image directly onto the card, not into the file system already established on the card.
Having copied the disk image to the card it just needs to insert the card into the Raspberry Pi, connect it with an Ethernet cable to your LAN and to power it up. Your card is flashed fine when the red LED starts blinking slowly and then changes to fast blinking after a while. When the red LED reaches steady on, your Meteobridge has successfully reached out to the Internet, has loaded the application stack and is ready to go. When you don't see the blink -> fast blink sequence, your low level copying of the Meteobridge image to your microSD card has failed.
When you want to use the data storage features, you need a suitable microSD card. Please read here which cards are certified for use with Meteobridge on your Raspberry.
Flashing by the router's web interface
Nearly all of first HW revisions of the routers mentioned here were were able to load a Meteobridge firmware from the routers web interface and to flash this to become a Meteobridge. With more restrict regulations on router manufacturers todays routers current versions don't allow this any more by enforcing to load signed firmware images only. However, lets start with instructions how to bring Meteoebridge onto these old version routers which can still be found as used items, but are no more sold by the manufacturers.
Flashing Meteobridge Firmware to TL-MR3020 (version 1.x) - this unit is EOL
Please consult the TP-Link manual to understand how to get access with your browser to its web interface. What the manual will tell you is basically that you have to connect your PC/Laptop via Ethernet cable, and log in to the router's web interface (IP is 192.168.0.254, login name is "admin", password: "admin").
When you have access to web interface of TL-MR3020, overwrite factory firmware like a regular firmware update by meteobridge-tl-mr3020-v1.5.bin. Wait until unit restarts. After that it will be a Meteobridge client in standard configuration receiving an IP via DHCP from your router in the LAN. It is important to use this Meteobridge version 1.5 firmware as previous firmware will not work on some of the MR3020 tagged by TP-Link as revision 1.9.
Flashing Meteobridge Firmware to TL-WR902AC (version 1.x) - this unit is EOL
Please consult the TP-Link manual to understand how to get access with your browser to its web interface. If you don't want to do this via WiFi as explained in the TP-Link manual then you can also connect to it from within your LAN as follows:
- Set the mode switch of the TL-WR902AC to "AP / Ring Ext/ Client".
- Connect the device with an Ethernet cable to your LAN.
- Power up the device and wait until four LEDs show steady green.
- Check your routers log files to understand what IP it has given the device (DHCP service logs) or start an IP scanner to find the TP-Link device and its IP in your LAN.
- Browse with your PC to this IP.
The start screen will ask for user and password. Please enter "admin" for both. Select "System Tools" and "Firmware Upgrade" from the menu on the left. Download Meteobridge firmware meteobridge-tl-wr902-v1.1.bin and use this file for firmware upgrade. Wait until unit restarts. After that it will be a Meteobridge client in standard configuration receiving an IP via DHCP from your router in the LAN.
Flashing Meteobridge Firmware to TL-MR3040 (version 2.x) - this unit is EOL
This firmware image is just valid for the 2.x version of the MR3040. You have a 2.x version of this router if it has the 3G/WSP/AP switch at the side. Please consult the TP-Link manual to understand how to get access with your browser to its web interface. What the manual will tell you is basically that you have to connect your PC/Laptop via Ethernet cable, and log in to the router's web interface (IP is 192.168.0.1, login name is "admin", password: "admin"). When you have access to web interface of TL-MR3040, overwrite factory firmware like a regular firmware update by meteobridge-tl-mr3040v2-v1.5.bin. Wait until unit restarts. After that it will be a Meteobridge client in standard configuration receiving an IP via DHCP from your router in the LAN. Please note that the TL-MR3040 does not provide slow blinking during boot. So LEDS will mainly stay dark until loading of Meteobridge application stack is indicated by fast blinking. This is just an oddity with the LEDs that does not have an impact on proper operation. You can find out on page "System Tools -> Firmware Upgrade" of your router if it is a hardware version 1.x or 2.x.
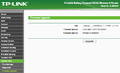
hardware version 2.x

Flashing Meteobridge Firmware to TL-WR703N (versions 1.0 to 1.6) - this unit is EOL
As TL-WR703N does only come with a Chinese web interface, it might be a bit tricky to find the right menu item to initiate firmware update. First you have to login with your browser. To achieve that you have to connect your PC/Laptop via ethernet cable, and log in to the router's web interface (IP is 192.168.1.1, login name is "admin", password: "admin").
When you have access to web interface of TL-WR703N, you select the item at the bottom of the left menu items, marked in light red on the left picture below (system screen). Next you choose sub menu item as marked in light red in the right picture below (flash screen) and browse to target file by pressing light red marked file select dialog in the middle of the screen. You find Meteobridge firmware for this device here: meteobridge-tl-wr703n-v1.4.bin.
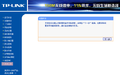
system screen
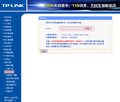
flash screen


Finally, a "are you sure" dialog will pop up, please press "yes" button and wait until progress bar has reached 100%. Unit will reboot automatically. After reboot it will be a Meteobridge in standard configuration receiving an IP via DHCP from your router in the LAN.
Flashing Meteobridge Firmware to DIR-505
D-Link DIR-505 provides a "Router Recovery Mode", but firmware update through this does not work with todays browsers. Therefore, it is recommended to use the firmware update function of the DIR-505's stock firmware. This is done in a few simple steps.
- Download Meteobridge firmware to your Laptop: meteobridge-dir-505-v1.3.bin (or meteobridge-dir-505l-v1.3.bin if you have a DIR-505L)
- Set mode switch of DIR-505 to "Router/AP".
- Power-on DIR-505.
- Wait until LED switches to green.
- Connect your laptop with the WLAN the DIR-505 has setup. SSID and passphrase is on a separate card in the box the DIR-505 came with.
- Start browser on your laptop and direct to "http://192.168.0.1".
- Cancel internet setup dialog provided by stock firmware.
- Enter as user "admin" without password.
- Select "maintenance" tab from the horizontal menu.
- Select "firmware" tab from the vertical menu.
- Select downloaded Meteobridge firmware in "firmware upgrade" section and press upload button (picture on the left).
- DIR-505 checks if firmware is compatible and starts upgrading (picture on the right). When done DIR-505 reboots as a Meteobridge.
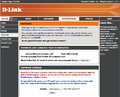
firmware upgrade screen
flashing progress

Flashing with the help of a TFTP server
As mentioned before todays TP-Link routers do not allow the easy and straight forward install of the Meteobridge firmware by flashing it via the routers web interface. Fortunately, the manufacturers created an alternative way to flash a new firmware without having a firmware image signed by the manufacturer. This is done by TFTP. It works as follows.
- you setup a TFTP server in your LAN
- you give the TFTP server the IP the router will request the firmware image from
- you tell the TFTP server which firmware image to hand-over to the router in request
- you connect the router with your LAN and start TFTP flashing on the router (by pressing some button during power-up)
The hurdle to master here is to setup an TFTP server and to give at the right IP. The next paragraphs will explain how to do that on a Linux box, on Windows 10, and Mac OS.
Setup of TFTP server on Linux
Linux distrubtions do normaly come with TFTP server installed. If not, please consult how to install that on your disctint distribution. Having done so you just need to give your Linux box an additional IP, which the router will ask for the firmware image. For TP-Link routers this IP is 192.168.0.66 or 192.168.0.225. You can't say which one is right for you as TP-Link changed that with some internal HW revisions you can't see from the outside. So please give both a chance. The Linux command to be used for this is:
sudo ip addr add dev eth0 192.168.0.225/24or
sudo ip addr add dev eth0 192.168.0.66/24
When the TFTP server is setup fine, you need to locate the firmware file into the TSTP servers data folder, which is "/tftpboot" in may cases.
Setup of TFTP server on Windows
Windows 10 does not come with a pre-installed TFTP server, but you can download and install a free one from here. Next is to install and configure the TFTP server accordingly. Please follow the instructions given here. Please don't make use of the "Only allow the following IP addresses to send/receive files" option. When finally starting the TFTP server, give 192.168.0.225 or 192.168.0.66 as server IP address, like in this example (where the file to be provides is assumed to be in "C:\TFTP-ROOT" directory:
Tftp -i 192.168.0.66 put C:\TFTP-ROOT\tp_recovery.bin
Setup of TFTP server on Mac OS
Recent Mac OS versions do have a TFTP server preinstalled. The directory where to place the firmware file to be handed-over to the client is normally located at "/private/tftpboot". Only thing to do is to start the TFTOP server on your Mac. This is done by this shell command (Catalina):sudo launchctl load -F /System/Library/LaunchDaemons/tftp.plistHaving done so you can check with this command if it is running:
netstat -atp UDP | grep tftp >/dev/null && echo "OK"If this returns "OK" the TFTP server is up and running.
Next step is to give the Mac one of the two IP address the client will be looking for. You achieve this by shell commands:
sudo ifconfig en0 alias 192.168.0.225/24 upor
sudo ifconfig en0 alias 192.168.0.66/24 up
Flashing Meteobridge Firmware to TL-MR3020 (version 3.x)
First of all you have to setup a TFTP Server on your PC as explained in the previous paragraphs. Then proceed as follows:
- Download the firmware file meteobridge-tl-mr3020v3-v1.3.bin to your PC.
- Rename the downloaded file to "tp_recovery.bin" and copy it into the TFTP data folder on your PC.
- Connect the MR3020 with an Ethernet cable to the same LAN your TFTP server is in.
- Press the large button on the top of the MR3020 and keep it pressed.
- Connect the MR3020 to power while you keep the button pressed.
- Wait about 15 seconds until bursts of fast blinking small LED converts to ongoing fast blinking of small LED then release the button.
Now the MR3020 is flashed to Meteobridge. When everything works fine it will start blinking slowly with the large LED after a while, will then start fast blinking and will end up with the large LED steady on after about 2 minutes.
Flashing Meteobridge Firmware to TL-WR902AC (version 3.x)
First of all you have to setup a TFTP Server on your PC as explained in the previous paragraphs. Then proceed as follows:
- Download the firmware file meteobridge-tl-wr902v3-v1.3.bin to your PC.
- Rename the downloaded file to "tp_recovery.bin" and copy it into the TFTP data folder on your PC. # Connect the WR902AC with an Ethernet cable to the same LAN your TFTP server is in.
- Press the reset button behind the pin hole named "RESET" with a paper clip and keep it pressed.
- Connect the WR902AC to power while you keep the button pressed.
- Wait 15 seconds an then release the button.
Now the WR902AC is flashed to Meteobridge. When everything works fine it will start blinking slowly with the large LED after a while, will then start fast blinking and will end up with the large LED steady on after about 2 minutes.
Addendum: Currently V4 versions of WR902AC hit the market. These differ in the WiFi chips used. Therefore, Meteobridge image made for V3 will not support WiFi on V4 models. The rest is expected to work fine.
Flashing Meteobridge Firmware to WL-330N3G (newest version no longer flashable)
As ASUS WL-330N3G cannot be flashed by its stock web interface, it is necessary that you send the firmware via TFP to it. Here you don't have to setup a TFTP server but a TFTP client because the WL-330N3G acts as a TFTP server and your PC connects to it as a TFTP client.
First of all the router needs to toggled into "TFTP update mode". This is done by keeping the button on the top pressed for 5-10 seconds while doing a power cycle. After a couple of seconds the power LED starts a very slow blinking. You can now release the button. Router now waits for being firmware-updated via TFTP.
Flashing via WL-330N3G TFTP on Linux
TFTP update does not need any additional software installed, your Linux already has all you need. Flashing is very straight forward, just execute the script below.#!/bin/sh # if [ "$1" = "" ] then echo "error: flash sys file missing as parameter" exit 1 else echo "power cycle WL-330N3G with button pressed and wait" echo "until power LED does go off and on again. Then " echo "release button and press <RETURN>." read a echo "start flashing..." ifconfig br0:0 192.168.1.20 echo -ne "binary\ntrace\nrexmt 1\nput $1\nquit\n" | tftp 192.168.1.1 echo "...transfer done." echo "Wait until unit does reboot (will take at least 2 minutes). " echo "Do not remove from power during flash process!" fi
The script needs to be called with the flash update file meteobridge-wl-330n3g-v1.2.sys as parameter. Please execute the script as root, otherwise "ifconfig" and "tftp" will not do or will ask for root password. "ifconfig" sets a virtual ethernet adapter with IP 192.168.1.20 on your Linux box, which is the IP the router expects to get the firmware update from.
Flashing WL-330N3G via TFTP on Windows 7
First you have to enable the TFTP service of your Windows 7. You can do that by
- Open Control Panel > Programs and Features
- Click "Turn Windows features on or off" on left side menu
- Enable "TFTP Client" then click OK button
Next step is to set the IP of your hosts Ethernet adapter to "192.168.1.20". This will disconnect your Host from your network (as far as your equip is not in the 192.168.1.x class c subnet) but it is necessary to use this distinct IP address in order to make the WL-330N3G to accept the flash data transfer. If you dont know how to set your Ethernet adapter to a static IP, please have a look here.
When TFTP is enabled and IP of your host PC is set to 192.168.1.20 we can start flashing. Please open a CMD shell and type in the command:tftp -i 192.168.1.1 put flash-file-nameHere flash-file-name is the name of the image to flash and you find the correct flash file at meteobridge-wl-330n3g-v1.2.sys. When command is done successfully, number of transferred bytes is displayed.
Final Flashing Tasks
IP of router in update mode is 192.168.1.1, which hopefully will not do a collision with one of your other devices. If there is a collision, switch off the other devices during flash. After data has been transferred via TFTP you have to wait a couple of minutes until flash process inside the router is done and router restarts itself. Restart switches off all LEDs for a short time. Now it is safe to disconnect the router from power. Interrupting the flash processes by a power cycle will brick the router.
Flash Again
When you need to flash a new Meteobridge firmware to your TL-MR3020, TL-MR3040, TL-WR703N or DIR-505, you can do that by calling the URL "http://ip-of-your-meteobridge/cgi-bin/fwupdate.cgi". This will shutdown some running services and will bring you to the openwrt SW stack below Meteobridge application software stack. If your device cannot load Meteobridge application stack from the Internet for some reason, you can also directly access openwrt web interface by browsing to "http://ip-of-your-meteobridge-device/cgi-bin/luci". Login with your Meteobridge password and go to "System" tab. Select sub tab "Backup / Flash Firmware" and use offered "Flash new firmware" section. Unmark "keep settings" option and start flashing. Keep device connected to power, it will restart automatically. If you have a WL-330N3G, this always needs to be flashed with the TFTP environment as in setup section for that device explained.