Preparing Hardware
<languages /><translate>
To make a Meteobridge out of the pocket WLAN routers introduced below, you simply have to install an applicable Meteobridge firmware image. Flashing the firmware can mostly be done with the firmware update functions the router's stock firmware does provide. By doing so you will void the manufacturers warranty, but having the cheap price in mind you will certainly not face a substantial financial risk in the unlikely event that you brick the router.
If you don't like the idea of flashing devices, you can also reach out for a Meteobridge reseller, who has Meteobridges on standard HW already flashed and fully licensed in Where to Buy? section.
If you own a Meteobridge PRO, please ignore these pages completely as your unit is already flashed the right way in the factory.
Flashing Meteobridge Firmware to TL-WR902AC (version 1.x)
Meteobridge image does only support WR902AC hardware version 1.x, which can be identified by stickers on the sealed box and the device itself. Please consult the TP-Link manual to understand how to get access with your browser to its web interface. If you don't want to do this via WiFi as explained in the TP-Link manual then you can also connect to it from within your LAN as follows:
- Set the mode switch of the TL-WR902AC to "AP / Ring Ext/ Client".
- Connect the device with an Ethernet cable to your LAN.
- Power up the device and wait until four LEDs show steady green.
- Check your routers log files to understand what IP it has given the device (DHCP service logs) or start an IP scanner to find the TP-Link device and its IP in your LAN.
- Browse with your PC to this IP.
The start screen will ask for user and password. Please enter "admin" for both. Select "System Tools" and "Firmware Upgrade" from the menu on the left. Download Meteobridge firmware meteobridge-tl-wr902-v1.1.bin and use this file for firmware upgrade. Wait until unit restarts. After that it will be a Meteobridge client in standard configuration receiving an IP via DHCP from your router in the LAN.
Flashing Meteobridge Firmware to TL-MR3020 (version 1.x)
Meteobridge image does only support MR3020 hardware version 1.x. The new version 3 which can currently be found in Asia is not supported by Meteobridge. Please stay away from these V3 models. V3 models are advertised with 300 Mbit/s WiFi and are labeled V3 at the sticker of the back of the unit.
Please consult the TP-Link manual to understand how to get access with your browser to its web interface. What the manual will tell you is basically that you have to connect your PC/Laptop via Ethernet cable, and log in to the router's web interface (IP is 192.168.0.254, login name is "admin", password: "admin"). When you have access to web interface of TL-MR3020, overwrite factory firmware like a regular firmware update by meteobridge-tl-mr3020-v1.5.bin. Wait until unit restarts. After that it will be a Meteobridge client in standard configuration receiving an IP via DHCP from your router in the LAN. It is important to use this Meteobridge version 1.5 firmware as previous firmware will not work on some of the MR3020 tagged by TP-Link as revision 1.9.
Flashing Meteobridge Firmware to TL-MR3020 (version 3.x)
Flashing of version 3 model cannot be done by the web interface of the TP-Link stock firmware, because the web interface accepts firmware images digitally signed by TP-Link only. But there is an alternative way to bring a new firmware onto the device. This is by providing the firmware image via TFTP. To make installation most easy we provide a virtual machine image that does setup a TFTP server with the right configuration. In the next paragraphs we describe two ways of bringing the Meteobridge firmware onto the MR3020v3.
Preparing your own TFTP service
When you are running a Linux operating system you probably already have a TFTP server process running and then you just need to follow these simple steps:
- Download the firmware file meteobridge-tl-mr3020v3-v1.3.bin to your PC.
- Rename the downloaded file to "tp_recovery.bin" and copy it into the TFTP server folder on your Linux machine. On most distributions this will be "/srv/tftpboot/"
- Add a secondary IP to your Linux box by the shell command "sudo ip addr add dev eth0 192.168.0.225/24". Now your Linux box acts as a TFTP server to feed the Meteobridge firmware for flashing your MR3020v3.
Installation of a pre-configured virtual machine for TFTP flashing
When setting up and configuring a TFTP server on your PC on your own is not the way you want to go, then we recommend that you use a ready-made virtual machine that needs no configuration on your side. This approach should work for all major operating systems (Mac OS, Windows, Linux).
- Download free software VirtualBox (download page). VirtualBox is available for Mac OS, Windows and Linux.
- Install downloaded VirtualBox package on your System.
- Download Meteobridge-TFTP-Server (1.1 GB).
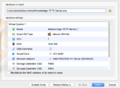
- Double-click onto the downloaded Meteobridge server image. Virtual box will start and will show you a window that allows to import that image as an appliance. Simply press "Import" button and an import progress bar will pop up. Import should take less than a minute.
- Meteobridge_TFTP-Server will now show up as an available virtual machine in the list on the left. Select it and press the green "Start" button.
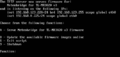
- Virtual machine will start and lots of log messages will scroll through a black terminal window. Just ignore and wait until screen holds and shows flashing dialog.
Appliance Import

Import Progress Bar
Loaded Virtual Machine
Terminal Window


Flashing Meteobridge Firmware
Having done the steps mentioned before (setting up your own TFTP server or using a virtual machine image) you are ready to actually flash the Meteobridge firmware onto the MR3020v3.
- Connect the MR3020v3 with an Ethernet cable to the same LAN your TFTP server is in.
- Press the large button on the top of the MR3020v3 and keep it pressed.
- Connect the MR3020 to power while you keep the button pressed.
- Wait 15 seconds an then release the button.
Now the MR3020 is flashed to Meteobridge. When everything works fine the MR3020 will start blinking slowly with the large LED after a while, will then start fast blinking and will end up with the large LED steady on after about 2 minutes.
Flashing Meteobridge Firmware to TL-MR3040 (version 2.x)
This firmware image is just valid for the 2.x version of the MR3040. You have a 2.x version of this router if it has the 3G/WSP/AP switch at the side. Please consult the TP-Link manual to understand how to get access with your browser to its web interface. What the manual will tell you is basically that you have to connect your PC/Laptop via Ethernet cable, and log in to the router's web interface (IP is 192.168.0.1, login name is "admin", password: "admin"). When you have access to web interface of TL-MR3040, overwrite factory firmware like a regular firmware update by meteobridge-tl-mr3040v2-v1.5.bin. Wait until unit restarts. After that it will be a Meteobridge client in standard configuration receiving an IP via DHCP from your router in the LAN. Please note that the TL-MR3040 does not provide slow blinking during boot. So LEDS will mainly stay dark until loading of Meteobridge application stack is indicated by fast blinking. This is just an oddity with the LEDs that does not have an impact on proper operation. You can find out on page "System Tools -> Firmware Upgrade" of your router if it is a hardware version 1.x or 2.x.
hardware version 2.x

Flashing Meteobridge Firmware to TL-WR703N (versions 1.0 to 1.6)
As TL-WR703N does only come with a Chinese web interface, it might be a bit tricky to find the right menu item to initiate firmware update. First you have to login with your browser. To achieve that you have to connect your PC/Laptop via ethernet cable, and log in to the router's web interface (IP is 192.168.1.1, login name is "admin", password: "admin").
When you have access to web interface of TL-WR703N, you select the item at the bottom of the left menu items, marked in light red on the left picture below (system screen). Next you choose sub menu item as marked in light red in the right picture below (flash screen) and browse to target file by pressing light red marked file select dialog in the middle of the screen. You find Meteobridge firmware for this device here: meteobridge-tl-wr703n-v1.4.bin.
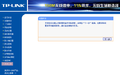
system screen
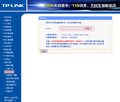
flash screen


Finally, a "are you sure" dialog will pop up, please press "yes" button and wait until progress bar has reached 100%. Unit will reboot automatically. After reboot it will be a Meteobridge in standard configuration receiving an IP via DHCP from your router in the LAN.
Flashing Meteobridge Firmware to WL-330N3G (newest version no longer flashable)
As ASUS WL-330N3G cannot be flashed by its stock web interface, it is necessary that you setup a TFTP environment on your Host PC to transfer the flash data via Ethernet to WL-330N3G. Using TFTP is quite simple.
First of all the router needs to toggled into "TFTP update mode". This is done by keeping the button on the top pressed for 5-10 seconds while doing a power cycle. After a couple of seconds the power LED starts a very slow blinking. You can now release the button. Router now waits for being firmware-updated via TFTP.
Sections below describe how to do it for Linux and Windows 7.
Flashing via TFTP on Linux
TFTP update does not need any additional software installed, your Linux already has all you need. Flashing is very straight forward, just execute the script below.#!/bin/sh # if [ "$1" = "" ] then echo "error: flash sys file missing as parameter" exit 1 else echo "power cycle WL-330N3G with button pressed and wait" echo "until power LED does go off and on again. Then " echo "release button and press <RETURN>." read a echo "start flashing..." ifconfig br0:0 192.168.1.20 echo -ne "binary\ntrace\nrexmt 1\nput $1\nquit\n" | tftp 192.168.1.1 echo "...transfer done." echo "Wait until unit does reboot (will take at least 2 minutes). " echo "Do not remove from power during flash process!" fi
The script needs to be called with the flash update file meteobridge-wl-330n3g-v1.2.sys as parameter. Please execute the script as root, otherwise "ifconfig" and "tftp" will not do or will ask for root password. "ifconfig" sets a virtual ethernet adapter with IP 192.168.1.20 on your Linux box, which is the IP the router expects to get the firmware update from.
Flashing via TFTP on Windows 7
First you have to enable the TFTP service of your Windows 7. You can do that by
- Open Control Panel > Programs and Features
- Click "Turn Windows features on or off" on left side menu
- Enable "TFTP Client" then click OK button
Next step is to set the IP of your hosts Ethernet adapter to "192.168.1.20". This will disconnect your Host from your network (as far as your equip is not in the 192.168.1.x class c subnet) but it is necessary to use this distinct IP address in order to make the WL-330N3G to accept the flash data transfer. If you dont know how to set your Ethernet adapter to a static IP, please have a look here.
When TFTP is enabled and IP of your host PC is set to 192.168.1.20 we can start flashing. Please open a CMD shell and type in the command:tftp -i 192.168.1.1 put flash-file-nameHere flash-file-name is the name of the image to flash and you find the correct flash file at meteobridge-wl-330n3g-v1.2.sys. When command is done successfully, number of transferred bytes is displayed.
Final Flashing Tasks
IP of router in update mode is 192.168.1.1, which hopefully will not do a collision with one of your other devices. If there is a collision, switch off the other devices during flash. After data has been transferred via TFTP you have to wait a couple of minutes until flash process inside the router is done and router restarts itself. Restart switches off all LEDs for a short time. Now it is safe to disconnect the router from power. Interrupting the flash processes by a power cycle will brick the router.
Flashing Meteobridge Firmware to DIR-505
D-Link DIR-505 provides a "Router Recovery Mode", but firmware update through this does not work with todays browsers. Therefore, it is recommended to use the firmware update function of the DIR-505's stock firmware. This is done in a few simple steps.
- Download Meteobridge firmware to your Laptop: meteobridge-dir-505-v1.3.bin (or meteobridge-dir-505l-v1.3.bin if you have a DIR-505L)
- Set mode switch of DIR-505 to "Router/AP".
- Power-on DIR-505.
- Wait until LED switches to green.
- Connect your laptop with the WLAN the DIR-505 has setup. SSID and passphrase is on a separate card in the box the DIR-505 came with.
- Start browser on your laptop and direct to "http://192.168.0.1".
- Cancel internet setup dialog provided by stock firmware.
- Enter as user "admin" without password.
- Select "maintenance" tab from the horizontal menu.
- Select "firmware" tab from the vertical menu.
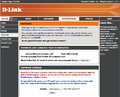
- Select downloaded Meteobridge firmware in "firmware upgrade" section and press upload button (picture on the left).
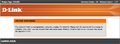
- DIR-505 checks if firmware is compatible and starts upgrading (picture on the right). When done DIR-505 reboots as a Meteobridge.
firmware upgrade screen
flashing progress

Flash Again
When you need to flash a new Meteobridge firmware to your TL-MR3020, TL-MR3040, TL-WR703N or DIR-505, you can do that by calling the URL "http://ip-of-your-meteobridge/cgi-bin/fwupdate.cgi". This will shutdown some running services and will bring you to the openwrt SW stack below Meteobridge application software stack. If your device cannot load Meteobridge application stack from the Internet for some reason, you can also directly access openwrt web interface by browsing to "http://ip-of-your-meteobridge-device/cgi-bin/luci". Login with your Meteobridge password and go to "System" tab. Select sub tab "Backup / Flash Firmware" and use offered "Flash new firmware" section. Unmark "keep settings" option and start flashing. Keep device connected to power, it will restart automatically. If you have a WL-330N3G, this always needs to be flashed with the TFTP environment as in setup section for that device explained. </translate>